基础篇
Linux 的目录结构
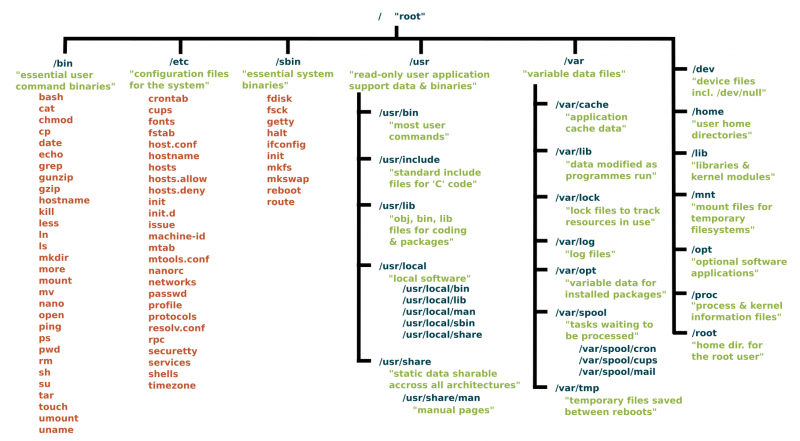
Linux 树状目录结构表
简单类比 windows
| Linux | Windows |
|---|---|
| /usr | C:\Programe files |
| /lib | C:\windows\system32 |
| /etc | Windows Registery |
最基本目录
/bin,/dev,/etc,/lib,/proc,/sbin,/usr,/home,/root,/mnt
常用目录
/home: 存放各用户的主目录。
- /home/<username>/.config
- /home/test/.config/autostart/xxxx.desktop
- 各种各样的配置文件 例如 .bashrc
/etc: 系统设置文件
- /etc/init.d/ 开机启动的服务
- /etc/apt/ apt-get 配置
/var/log : 系统的log
- dmesg /var/log/dmesg
- boot.log /var/log/boot.log
- XWindow log /var/log/Xorg.0.log
- system log /var/log/syslog
/usr: 安装主要的系统文件和软件
- /usr/include/: 头文件的位置;
- /usr/src: 内核和软件的源代码的位置;
- /usr/local: 安装外来软件的地方;
/lib: 库文件以及driver;
- 网卡的driver目录 lib/modules/`uname -r`/kernel/drivers/net/ethernet
/dev: 设备文件,主要是各种驱动;
/dev/sda* 硬盘
/dev/tty* Terminal
/dev/null
/dev/urandrom 随机数生成器
/dev/stdin,/dev/stdout,/dev/stderr
echo "hello world" > /dev/stdout
/proc: Linux 内核的接口,可以通过它在运行时获取、改变系统内核的许多参数;但是逐渐 /sys 取待
- 各个进程的内核信息 /proc/<pid>
- 系统所有mount信息 /proc/mount
- 系统的上线时间 /proc/uptime
- 开机启动参数 /proc/cmdline
- 内核的sysbol表 /proc/kallsysms
/boot 系统启动用的文件 : grub config, initrd,vmlinuz;
/tmp: 用于创建临时文件或目录;系统重启就会清空
/bin: 用来存储用户命令和可执行程序
/sbin: 包含一些主要供超级用户用的可执行程序;
/mnt: 外挂设备的挂接点;
/root: 超级用户的目录;
Linux Shell Effecitive Skills
What’s is shell

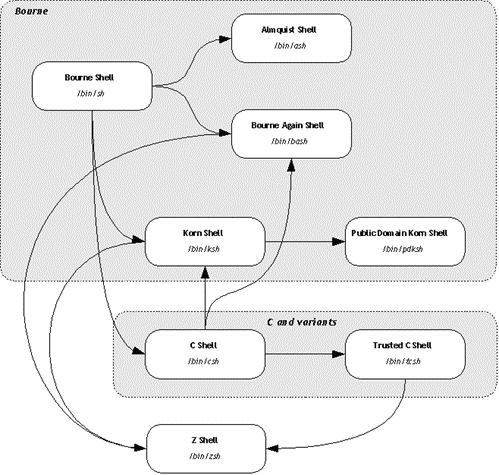
sh,csh/Tcsh,ksh,bash,zsh
Csh 1978 Ksh 1983 Bash 1988 zsh 1990
系统可交互接口,简练,接近自己语言。
- Unix小而美的哲学的典范。
- 所有的UNIX 命令,系统调用,公共程序,工具,和编译过的二进制程序,对于shell 脚本来说,都是可调用的.
- 所有shell feature 成熟,并且能够在新的shell上完成兼容。
Bash
通用性强, 大部分linux发行版本的默认shell
各种shell发展成熟,也成为后续的shell的事实标准
灵活的IO重定向,命令替换,管道组合可以 大大提高效率。
find | grep, ()& < > $()
- 高效交互方式
- Shell history and choose one
- Shell expansion
- Command execution
- Command line editing
- Text process
Bash 的原理框图
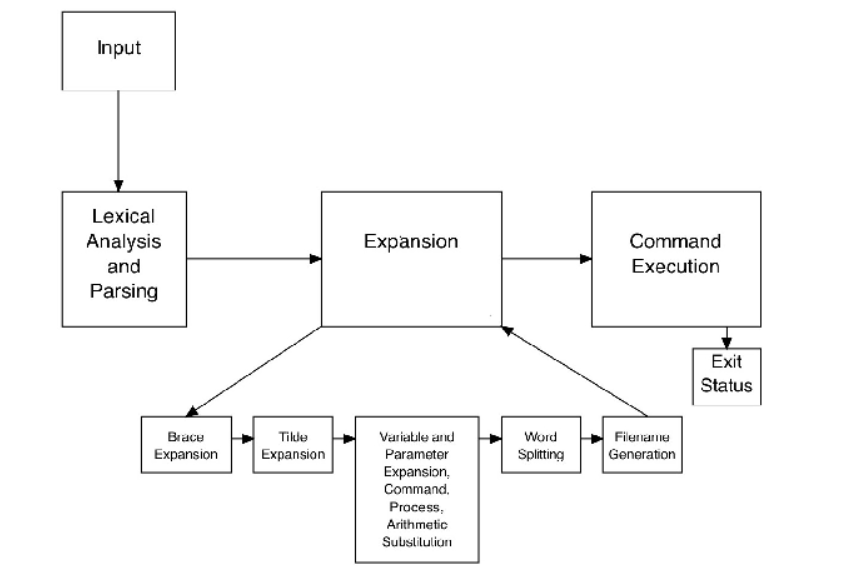
shell expansions
- brace expansion
- tilde expansion
- parameter and variable expansion
- arithmetic expansion
- command substitution
- word splitting; and
- filename expansion.
{} 直积(笛卡尔积)
\((a,b)* (x,y,z) => (a,x),(a,y),(a,z),(b,x),(b,y),(b,z)\)
$ echo {1..10}
1 2 3 4 5 6 7 8 9 10
$ echo {a..e}
a b c d e
$ echo {1..10..3}
1 4 7 10
$ echo {a..j..3}
a d g j
Bash$ mkdir -p Top/{a,b}/{i,k}/{o,p,q} Bash$ tree Top Top ├── a │ ├── i │ │ ├── o │ │ ├── p │ │ └── q │ ├── j │ │ ├── o │ │ ├── p │ │ └── q │ └── k │ ├── o │ ├── p │ └── q └── b ├── i │ ├── o │ ├── p │ └── q ├── j │ ├── o │ ├── p │ └── q └── k ├── o ├── p └── q scp -p xxx/{a,c,d,e} user@host:dest/ #备份命令,就是利用一个空参数来实现。 cp filename{,.bak} bash$ ls grub.cfg bash$ cp grub.cfg{,.bak} bash$ ls grub.cfg grub.cfg.bak ls *.{jpg,jpeg,png} # expands to *.jpg *.jpeg *.png - after which, # the wildcards are processed echo *.{png,jp{e,}g} # echo just show the expansions - # and braces in braces are possible.
~扩展
~ The value of $HOME
~/foo #$HOME/foo
~fred/foo  #The subdirectory foo of the home directory of the user fred
~+/foo $PWD/foo
变量与参数扩展
=`前后没有空格 `varname=”value” $varname ${varable}
把你常用的路径直接存为变量,可以减少cd 的次数

把你复杂的变量直接存为变量
mydu="du -csh"
speical variable 替换 扩展
"$0","The filename of the current script."
"$n","These variables correspond to the arguments with which a script was invoked. Here n is a positive decimal number corresponding to the position of an argument (the first argument is $1, the second argument is $2, and so on)."
"$$","The process ID of the current shell. For shell scripts, this is the process ID under which they are executing."
"$#",The number of arguments supplied to a script.
"$@","All the arguments are individually double quoted. If a script receives two arguments, $@ is equivalent to $1 $2."
"$*","All the arguments are double quoted. If a script receives two arguments, $* is equivalent to $1 $2."
"$?","The exit status of the last command executed."
"$!","The process ID of the last background command."
"$_", "The last argument of the previous command."

* 利用$* 来实现命令的封装,在你需要定制你的命令的时候
ll.sh
ls -l $*

*$@*
exec /usr/bin/flex -l "$@" 以前不知道为什么要有这些用法。现在明白了主要为了方便二次的转接。尤其在做接口函数的,这样可以无缝传给那些函数。正是通过些符号,我们很方便定制各种各样的命令,就样android中build 中envsetup,sh 中那些cgrep,regrep, 等等这些命令。进行二次封装可以大大加快的自己的速度。
参数替换
default value
${parameter:-word}
${parameter:=word}
${parameter:?word}
${parameter:+word}
string slice
${parameter:offset}
${parameter:offset:length}
#左匹配删除
${parameter#word}
${parameter##word}

# 右侧删除
${parameter%word}
${parameter%%word}

# 替换
${parameter/pattern/string}
# 小写
${parameter^pattern}
${parameter,pattern}

#小写
${parameter^^pattern}
${parameter,,pattern}
数学计算替换 仅支持整数 $(( expression ))
$(( 1+2 +3 ))
命令替换
$(command)
`command`
bash~$ date +%Y%m%d%H%M%S
20190330203926
bash~$ mkdir log_$(date +%Y%m%d%H%M%S)
bash~$ ls
log_20190330204008
bash~$
- 进程替换 <(list) or >(list)
可以实现比管道复杂的功能
diff <(ls $first_directory | sort) <(ls $second_directory | sort)` 直接来对比两条命令的输出。
Filename expansion (pattern matching)
* any
** rcursive match
? 0,1
[...] charter range
?(pattern-list)  0,1
*(pattern-list)  any
+(pattern-list)  1+
@(pattern-list)  1+
!(pattern-list)  not match
- example1
bash$ ls /etc/pam.d/
atd                  gdm-autologin           login             postlogin-ac       smtp              system-auth
chfn                 gdm-fingerprint         other             ppp                smtp.postfix      system-auth-ac
chsh                 gdm-launch-environment  passwd            remote             sshd              systemd-user
config-util          gdm-password            password-auth     runuser            sssd-shadowutils  vlock
crond                gdm-pin                 password-auth-ac  runuser-l          su                vmtoolsd
cups                 gdm-smartcard           pluto             setup              sudo              xserver
fingerprint-auth     ksu                     polkit-1          smartcard-auth     sudo-i
fingerprint-auth-ac  liveinst                postlogin         smartcard-auth-ac  su-l
bash$ cp /etc/pam.d/gdm-+(auto|pass)* .
bash$ ls
gdm-autologin  gdm-password
bash$
善用通配符,减少输入
vim **/*READ*  #open the README at any subfolder
vim /etc/pa*ac
$IFS <space>,<tab>,<newline>
Shell Command execution
命令,管道,IO重定向
commands
简单命令
list of Commands
&& || ; &
https://www.gnu.org/software/bash/manual/html_node/index.html#SEC_Contents
command1;comand2
command1 && command2
command1 || command2
- component Commands
if test-commands; then
  consequent-commands;
[elif more-test-commands; then
  more-consequents;]
[else alternate-consequents;]
fi

case word in
 [ [(] pattern [| pattern]…) command-list ;;]…
esac

until test-commands; do consequent-commands; done
while test-commands; do consequent-commands; done
for name [ [in [words …] ] ; ] do commands; done
- 在大部分情况下避免使用if,通过 find,grep等filter来实现过滤。
- loop 大部分情况只用for就够了,少部分使用while
Grouping commands as a unit
( list ) #/executed in a subshell
{ list; } #at current shell context
- redirection and pipeline is applied to the entire command list.
- parellel
bash$ cat test.sh
for i in 10.19.189.{1..255};
do
   (ping -c 1 $i &)
done 2>&1 | grep "ttl"

64 bytes from 10.19.189.1: icmp_seq=1 ttl=249 time=99.9 ms
64 bytes from 10.19.189.2: icmp_seq=1 ttl=249 time=107 ms
64 bytes from 10.19.189.3: icmp_seq=1 ttl=248 time=102 ms
64 bytes from 10.19.189.59: icmp_seq=1 ttl=57 time=92.2 ms
64 bytes from 10.19.189.69: icmp_seq=1 ttl=121 time=86.8 ms
64 bytes from 10.19.189.74: icmp_seq=1 ttl=56 time=86.6 ms
64 bytes from 10.19.189.177: icmp_seq=1 ttl=56 time=99.5 ms
64 bytes from 10.19.189.179: icmp_seq=1 ttl=57 time=95.5 ms
64 bytes from 10.19.189.207: icmp_seq=1 ttl=56 time=188 ms
64 bytes from 10.19.239.1: icmp_seq=1 ttl=249 time=94.5 ms
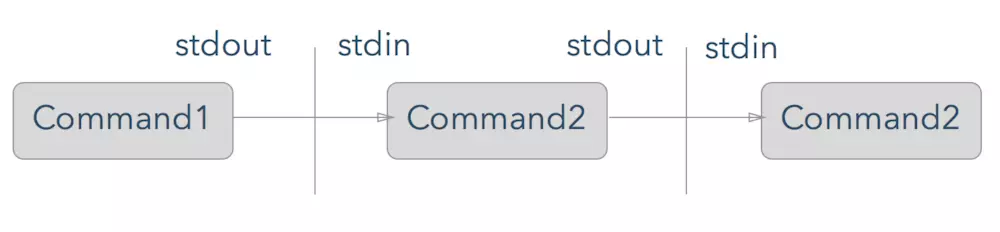
pipelines
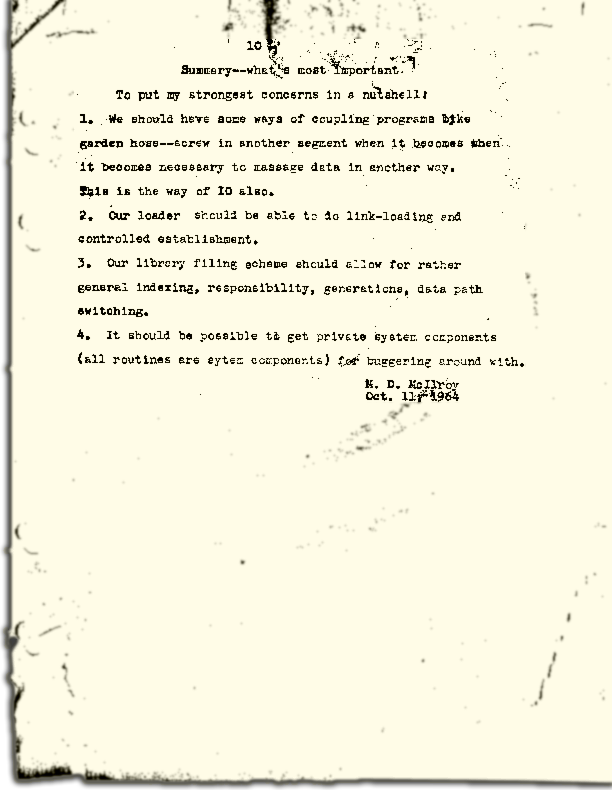
在Unix设计哲学中,有一个重要设计原则–KISS(Keep it Simple, Stupid),大概意思就是只关注如何做好一件事,并把它做到极致。每个程序都有各自的功能,那么有没有一样东西将不同功能的程序互相连通,自由组合成更为强大的宏工具呢?此时,管道出现了,它能够让程序实现了高内聚,低耦合 管道的发名者叫,Malcolm Douglas McIlroy,他也是Unix的创建者,是Unix文化的缔造者之一。他归纳的Unix哲学如下:
Pipes
command1 | command2
command1 |& command2
find -iname ".c"| xargs grep "open"
ls -l |sed -e 's/[aeio]/u/g'


bash$ ldd /usr/autodesk/maya2019/bin/maya.bin
     linux-vdso.so.1 =>  (0x00007ffdbb5d8000)
     libMaya.so => /usr/autodesk/maya2019/bin/../lib/libMaya.so (0x00007f52e43ad000)
     libIMFbase.so => /usr/autodesk/maya2019/bin/../lib/libIMFbase.so (0x00007f52e40db000)
     libAG.so => /usr/autodesk/maya2019/bin/../lib/libAG.so (0x00007f52e3a74000)
     libiff.so => /usr/autodesk/maya2019/bin/../lib/libiff.so (0x00007f52e383f000)
     libawGR.so => /usr/autodesk/maya2019/bin/../lib/libawGR.so (0x00007f52e3632000)
     libglew.so => /usr/autodesk/maya2019/bin/../lib/libglew.so (0x00007f52e33b3000)
     libclew.so => /usr/autodesk/maya2019/bin/../lib/libclew.so (0x00007f52e31ad000)
     libOpenCLUtilities.so => /usr/autodesk/maya2019/bin/../lib/libOpenCLUtilities.so (0x00007f52e2f89000)
     ... skip 30 lines ....
     libXp.so.6 => not found
     libXmu.so.6 => /lib64/libXmu.so.6 (0x00007f52c4131000)
     libXpm.so.4 => /lib64/libXpm.so.4 (0x00007f52c3f1f000)
     libXt.so.6 => /lib64/libXt.so.6 (0x00007f52c3cb8000)
     libXi.so.6 => /lib64/libXi.so.6 (0x00007f52c3aa8000)
     libXext.so.6 => /lib64/libXext.so.6 (0x00007f52c3896000)
     libxcb.so.1 => /lib64/libxcb.so.1 (0x00007f52b32c8000)
     .... skip 89 lines ....
     libjbig.so.2.0 => /lib64/libjbig.so.2.0 (0x00007f52b30bb000)
     libexpat.so.1 => /lib64/libexpat.so.1 (0x00007f52b2e91000)
     libbz2.so.1 => /lib64/libbz2.so.1 (0x00007f52b2c81000)
     libtbbmalloc_proxy.so.2 => not found
     libtbb_preview.so.2 => not found
     libtbbmalloc_proxy.so.2 => not found
     libtbb_preview.so.2 => not found
     libpcre.so.1 => /lib64/libpcre.so.1 (0x00007f52b2a1b000)
     libffi.so.6 => /lib64/libffi.so.6 (0x00007f52b2812000)
     libidn.so.11 => /lib64/libidn.so.11 (0x00007f52b25df000)
     libssh2.so.1 => /lib64/libssh2.so.1 (0x00007f52b23b5000)
     libssl3.so => /lib64/libssl3.so (0x00007f52b2162000)
     libplds4.so => /lib64/libplds4.so (0x00007f52b1f5e000)
     libplc4.so => /lib64/libplc4.so (0x00007f52b1d59000)
     libgssapi_krb5.so.2 => /lib64/libgssapi_krb5.so.2 (0x00007f52b1b0b000)
     libkrb5.so.3 => /lib64/libkrb5.so.3 (0x00007f52b1822000)
     libk5crypto.so.3 => /lib64/libk5crypto.so.3 (0x00007f52b1607000)
     libcom_err.so.2 => /lib64/libcom_err.so.2 (0x00007f52b1402000)
     liblber-2.4.so.2 => /lib64/liblber-2.4.so.2 (0x00007f52b11f3000)
     libldap-2.4.so.2 => /lib64/libldap-2.4.so.2 (0x00007f52b0f9e000)
     libgmodule-2.0.so.0 => /lib64/libgmodule-2.0.so.0 (0x00007f52b0d99000)
     libselinux.so.1 => /lib64/libselinux.so.1 (0x00007f52b0b72000)
     libresolv.so.2 => /lib64/libresolv.so.2 (0x00007f52b0958000)
     libmount.so.1 => /lib64/libmount.so.1 (0x00007f52b0715000)
     libgsttag-1.0.so.0 => /lib64/libgsttag-1.0.so.0 (0x00007f52b04d9000)
     liborc-0.4.so.0 => /lib64/liborc-0.4.so.0 (0x00007f52b0255000)
     libsystemd.so.0 => /lib64/libsystemd.so.0 (0x00007f52b0023000)
     libXau.so.6 => /lib64/libXau.so.6 (0x00007f52afe1f000)
     libkrb5support.so.0 => /lib64/libkrb5support.so.0 (0x00007f52afc0f000)
     libkeyutils.so.1 => /lib64/libkeyutils.so.1 (0x00007f52afa0b000)
     libsasl2.so.3 => /lib64/libsasl2.so.3 (0x00007f52af7ed000)
     libblkid.so.1 => /lib64/libblkid.so.1 (0x00007f52af5ad000)
     libcap.so.2 => /lib64/libcap.so.2 (0x00007f52af3a7000)
     liblz4.so.1 => /lib64/liblz4.so.1 (0x00007f52af192000)
     libgcrypt.so.11 => /lib64/libgcrypt.so.11 (0x00007f52aef11000)
     libgpg-error.so.0 => /lib64/libgpg-error.so.0 (0x00007f52aed0b000)
     libdw.so.1 => /lib64/libdw.so.1 (0x00007f52aeabc000)
     libcrypt.so.1 => /lib64/libcrypt.so.1 (0x00007f52ae884000)
     libattr.so.1 => /lib64/libattr.so.1 (0x00007f52ae67f000)
     libelf.so.1 => /lib64/libelf.so.1 (0x00007f52ae466000)
     libfreebl3.so => /lib64/libfreebl3.so (0x00007f52ae263000)
bash$ ldd /usr/autodesk/maya2019/bin/maya.bin | grep "not"
  libXp.so.6 => not found
  libfam.so.0 => not found
  libXp.so.6 => not found
  libXp.so.6 => not found
  libtbbmalloc_proxy.so.2 => not found
  libtbb_preview.so.2 => not found
  libtbbmalloc_proxy.so.2 => not found
  libtbb_preview.so.2 => not found
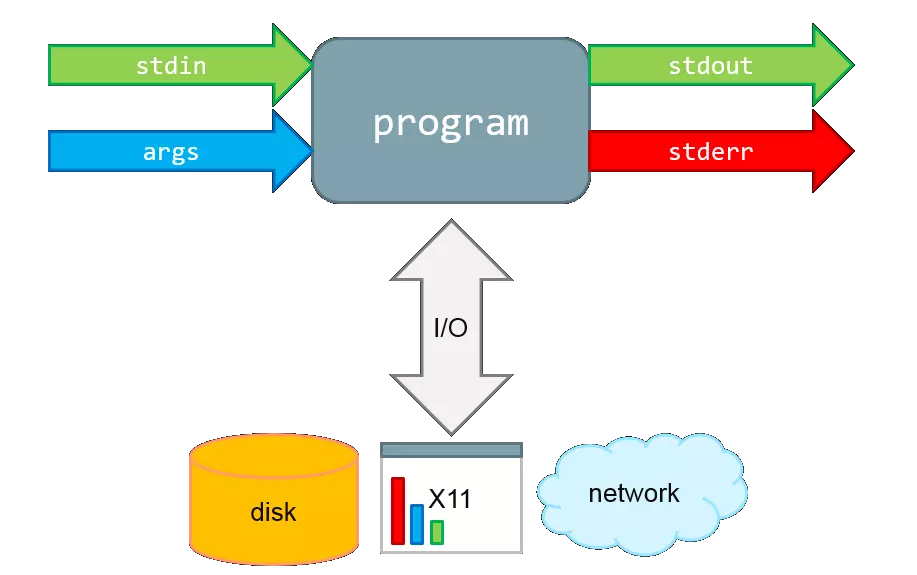
IO redirection
exec &> >(tee -a "$log_file")
echo This will be logged to the file and to the screen
$log_file will contain the output of the script and any subprocesses, and the output will also be printed to the screen.

>(...) starts the process ... and returns a file representing its standard input. exec &> ... redirects both standard output and standard error into ... for the remainder of the script (use just exec > ... for stdout only). tee -a appends its standard input to the file, and also prints it to the screen.
https://unix.stackexchange.com/questions/145651/using-exec-and-tee-to-redirect-logs-to-stdout-and-a-log-file-in-the-same-time
basic concept
- stdin 0,stdout 1,stderr 2, exec
- `` $()
- fork {},() &
simple one
ls -l > ls-l.txt grep da * 2> grep-errors.txt xxxx 2>&1 | tee log.txt stdout/stderr > stdin/exec <
rm -f $(find / -iname core) &> /dev/null
- {
action one action two
}> 1>out.out 2>error.log
对于文件的读写 例如读入前三行
{ read line1
  read line2
  read line3
} < /etc/fstab
{ code-block} >> output.log
例如下边的例子,生成 /etc/udev/rules.d/70-persistent-net.rules 的
/lib/udev/write_net_rules 生成函数。
write_rule() {
        local match="$1"
        local name="$2"
        local comment="$3"

        {
        if [ "$PRINT_HEADER" ]; then
                PRINT_HEADER=
                echo "# This file was automatically generated by the $0"
                echo "# program, run by the persistent-net-generator.rules rules file."
                echo "#"
                echo "# You can modify it, as long as you keep each rule on a single"
                echo "# line, and change only the value of the NAME= key."
        fi

        echo ""
        [ "$comment" ] && echo "# $comment"
        echo "SUBSYSTEM==\"net\", ACTION==\"add\"$match, NAME=\"$name\""
        } >> $RULES_FILE
}
重定向代码块的输出 {} >log.txt 直接一段代码所有输出都重定向到文件中。这样可以分以直接compile的log分开保存起来,在其内部直接重定向。
exec https://askubuntu.com/questions/525767/what-does-an-exec-command-do
exec 3</dev/null; ls -l /proc/self/fd
exec 3<&- ; ls -l /proc/&&/fd
exec <&-

https://www.tldp.org/LDP/abs/html/io-redirection.html

M>N
  # "M" is a file descriptor, which defaults to 1, if not explicitly set.
  # "N" is a filename.
  # File descriptor "M" is redirect to file "N."
M>&N
  # "M" is a file descriptor, which defaults to 1, if not set.
  # "N" is another file descriptor.
0< FILENAME
 < FILENAME
  # Accept input from a file.
  # Companion command to ">", and often used in combination with it.
  #
  # grep search-word <filename
 [j]<>filename
  #  Open file "filename" for reading and writing,
  #+ and assign file descriptor "j" to it.
  #  If "filename" does not exist, create it.
  #  If file descriptor "j" is not specified, default to fd 0, stdin.
  #
  #  An application of this is writing at a specified place in a file.
  echo 1234567890 > File    # Write string to "File".
  exec 3<> File             # Open "File" and assign fd 3 to it.
  read -n 4 <&3             # Read only 4 characters.
  echo -n . >&3             # Write a decimal point there.
  exec 3>&-                 # Close fd 3.
  cat File                  # ==> 1234.67890
  #  Random access, by golly.
更好完的重定向要属端口应用功能 了。
mknod /dev/tcp c 30 36 就可以STDIN/STDOUT/STDERR一样重定向了。
特别是/dev/tcp /dev/upd这些伪设备也是很好完的。
cat </dev/tcp/time.nist.gov/13
就得到的实现。
command line editing

- 路径补全,
- 命令补全,
- 命令参数补全,
- 智能拼写纠正
- 插件内容补全
command complete
apt-get install bash-completion
并且随着 bash的升级,4.3之后已经可以 自动补全 参数了。看来是越来越强了。如果是想自定义可以使用 http://kodango.com/bash-competion-programming
这一点zsh 做更灵活,各种补全,尽可能tab. 并且支持** 来递归。 如果这个做好,可以大大加快工作效率。例如 #. More on Using the Bash Complete Command 可以利用来自定义命令补全,是可以加上过滤条件的 #. Programmable-Completion bash 中有专门的文档来说明,据说zsh的补全做的最好。 #. 目前在对于android,已经有现在与补全功能了,在sdk/bash_compeletion/adb 加载了它之后,android下就可以自动补全了。 #. zsh adb completion
编辑模式 vi/emcas
set -o vi
man builtins 可以看许多有用东东,例如bind就可以进行键盘绑定的。就像vi 的map一样。
对于编辑模式的改变 bindkey -v vi vi模式。 https://www.ibm.com/developerworks/cn/linux/shell/z/ http://wdxtub.com/2016/02/18/oh-my-zsh/
history skill
这个是从 Tcsh 里学来的,https://www.wikiwand.com/en/Tcsh
! Start a history substitution, except when followed by a space, tab, the end of
the line, `=' or `('.
!n Refer to command line n.
!-n Refer to the command n lines back.
!! Refer to the previous command. This is a synonym for `!-1'.
!string Refer to the most recent command starting with string.
!?string[?]
Refer to the most recent command containing string. The trailing `?' may be
omitted if the string is followed immediately by a newline.
^string1^string2^
Quick Substitution. Repeat the last command, replacing string1 with string2.
Equivalent to !!:s/string1/string2/.
!# The entire command line typed so far.
troubleshoot debug
set -eux, strace
cmd1 && cmd2 && cm3 = set -e ;cmd1;cmd2;cmd3
- set -u The shell prints a message to stderr when it tries to expand a variable that’s is not set.Also it immediately exits.
- set -x print each command in sript to stderr before running it.
- set -o pipefail Pipelines failed on the first command which failes instead of dying later on down the pipepline.
- has options to control output format and support and OR
- “Exit Traps” Can Make Your Bash Scripts Way More Robust And Reliable
- http://redsymbol.net/articles/bash-exit-traps/
并且bash 命令回显机制是做的最好的,-verbose以及打印命令回显呢。 对于linux 下大部分的命令输出都是可以参数可控控制,并且大部分命令都支持 与或非 同时直接支持把结果当命令进一步执行这个不正是自己之前到 tcl 用到 subst 功能吗。
同时也就具备了m4 的部分功能。
shell function
如何在shell环境中添加自己的命令 之前自己干过,直接添加变量,或者直接在命令行赋值,直接添加全局变量,其实也很简单,那就是直接source 一个sh文件,它会当前的进程下执行。其本质那就是你是eval,exec,system,等等之间不同了。现在真正明白了这些操作区别,取决于如何得到这些操作以及结果。在python中脚本,那就execfile, 就像tcl的中source一样的。就像bash一样,我把可以把tcl,python直接当做脚本,但是perl是不行的,perl本身是没有交互环境。 并且在bash 中 “. ” 点+ 空格就相当于source.
# perl style
#!/bin/bash
function quit {
   exit
}
function e {
    echo $1
}
e Hello
e World
quit
echo foo

# C style

function e () {
    echo $1
}
- include other bash scripts into current context. source and “.”
text Process
Regular Expression
. * [] ? {} () ^,$
tools collections
交并补
- diff,sort/tsort,uniq,join,paste,join,wc,
- expand,cut,head,tail,look,sed,awk,tr,grep
- fold,fmt,col,column,nl,pr
sort/tsort
-b, --ignore-leading-blanks  ignore leading blanks
-d, --dictionary-order      consider only blanks and alphanumeric characters
-f, --ignore-case           fold lower case to upper case characters
-g, --general-numeric-sort  compare according to general numerical value
-i, --ignore-nonprinting    consider only printable characters
-M, --month-sort            compare (unknown) < 'JAN' < ... < 'DEC'
-h, --human-numeric-sort    compare human readable numbers (e.g., 2K 1G)
-n, --numeric-sort          compare according to string numerical value
-r, --reverse               reverse the result of comparisons
-k, --key=KEYDEF          sort via a key; KEYDEF gives location and type
-m, --merge               merge already sorted files; do not sort
-t, --field-separator=SEP  use SEP instead of non-blank to blank transition
-u, --unique              with -c, check for strict ordering;
                         without -c, output only the first of an equal run
$ cat  employee.txt
manager  5000
clerk    4000
employee  6000
peon     4500
director 9000
guard     3000

$ sort -k 2n employee.txt
guard    3000
clerk    4000
peon     4500
manager  5000
employee 6000
director 9000
$ cat call-graph
main parse_options
main tail_file
main tail_forever
tail_file pretty_name
tail_file write_header
tail_file tail
tail_forever recheck
tail_forever pretty_name
tail_forever write_header
tail_forever dump_remainder
tail tail_lines
tail tail_bytes
tail_lines start_lines
tail_lines dump_remainder
tail_lines file_lines
tail_lines pipe_lines
tail_bytes xlseek
tail_bytes start_bytes
tail_bytes dump_remainder
tail_bytes pipe_bytes
file_lines dump_remainder
recheck pretty_name
$ # note: 'tac' reverses the order
$ tsort call-graph | tac
dump_remainder
start_lines
file_lines
pipe_lines
xlseek
start_bytes
pipe_bytes
tail_lines
tail_bytes
pretty_name
write_header
tail
recheck
parse_options
tail_file
tail_forever
main
https://www.wikiwand.com/en/Tsort https://github.com/Idnan/bash-guide,有大量的例子可以用直接用
uniq -c
sed -e 's/lamb/goat/'
cut -d ' ' -f1,2 /etc/mtab
- paste
精确的文档生成
$>
-> for cl in 19156448 19064514 19006994; do p4 shelve -r -c $cl && echo -e "-------------\n"; done
Shelving files for change 19156448.
add //sw/README.mkd#none
add //sw/TestPlan.pm#none
add //sw/build_checker.pl#none
add //sw/build_installer.pl#none
add //sw/builds/aardvark/nightly/20141218_aardvark_nightly_debug/data/hello.txt#none
add //sw/builds/aardvark/nightly/20141218_aardvark_nightly_debug/data/world.txt#none
add //sw/builds/aardvark/nightly/20141219_aardvark_nightly_debug/data/hello.txt#none
add //sw/builds/aardvark/nightly/20141219_aardvark_nightly_debug/data/world.txt#none
add //sw/builds/aardvark/nightly/20141219_aardvark_nightly_debug/installer/installer.pl#none
add //sw/test_project/data/taskEntry.pl#none
Change 19156448 files shelved.
-------------

Shelving files for change 19064514.
edit //sw/devtools/QA/Tools/Farm/exec/Nexus/Submit_ToT.pl#4
Change 19064514 files shelved.
-------------

Shelving files for change 19006994.
edit //sw/doc/code-notes.mkd#1
edit //sw/FarmEntry.pm#33
add //sw/BuildCheckerV2.pl#none
add //sw/d/TestPlan.pm#none
add //sw/AppConfigValidator.pm#none
add //sw/Machine.pm#none
Change 19006994 files shelved.
-------------
参考
Linux 基本命令
命令补全
bash 的命令补全功能,不只是简单的字符串补全,而是根据上下文来补全。这些都的实现都在 /usr/share/bash=complete 中。 如果没有可以安装 apt=get install bash=complete
<a href=”https://asciinema.org/a/LUcAqGRm2vJc8sQYUlhO4fIef?autoplay=1” target=”_blank”><img src=”https://asciinema.org/a/LUcAqGRm2vJc8sQYUlhO4fIef.png” width=”835”/></a>
service 命令,它列出系统中有 services .
IO redirection
On Linux, /dev/stdin, /dev/stdout, /dev/stderr are symbolic links to /proc/self/fd/0, /proc/self/fd/1, /proc/self/fd/2
关机操作
关机:
/sbin/halt #杀掉所有进程,只是关掉CPU
/sbin/poweroff #除了halt,关掉主板的各种设备,最后关电
shutdown =h now  #可以执行额外的脚本
init 0
重启: /sbin/reboot
修改密码:password
目录操作
- 查看当前目录:pwd
- 返回目录:cd
- 返回上一层目录: cd ..
- 当前目录:cd .
文件操作
- 创建目录: mkdir
- 删除目录: rmdir
- 打开文件(读写文件): vim
- 关闭文件:wq
- 移动文件: mv
- 删除文件: rm
- 复制文件或目录: cp
- 在文件间建立连接: ln =s(软连接)
- 查找文件: find
- 基于内容查找: grep
https://github.com/lujun9972/lujun9972.github.com/issues/25#sec-1-18 : 操作符
命名管道
mkfifo in_data out_data
command <in_data >out_data &
exec 3> in_data 4< out_data
echo <some thing here> >&3
read <some variables here> <&4
其它
- 查看网络设备: ifconfig
- 安装程序包: sudo apt=get
- 查看任务管理器进程: ps
- 查看命令历史: history
- 产看帮助: man,help
解压
| ext | cmd | |
|---|---|---|
| tar.gz | tar =xzvf abc.tar.gz | |
| tar.bz2 | tar =xjvf abc.tar.bz2 | |
| .zip | unzip abc.zip | |
| .rar | unrar x abc.rar | apt=get install unrar |
tar 到指定的目录
tar =xzvf abc.tgz =C Dest
python tarfile 以及 python zipfile
当然也可以用tar 来代替 cp,在大量小文件的时候,可以加快速度。相当于先打包再传输。 tar =cvf = /etc |tar =xvf = 就是这样的目的。
ar
同tar是一类东东,现在只剩下用来打包库了,现在ld 好像只认这种ar这种格式。 如果你想重新打包。 只要 ar =x xxx.a && ar =c libaz.a XX.o 就可以了。 https://www.quora.com/Whats=the=difference=between=ar=and=tar
grep
正则表达式,是不需要转义的, :command:` grep =E` 或者 egrep. 对于输出的控制很灵活,可以计数,可以高亮,以及只显文件名,以及支持与或非。 对于或的支持 可以用 grep =F 或者 fgrep 后接一个文件列表 只要直接pattern列表,每一行一个,这些pattern的关系是 any(patterns)的关系。 同时正则表达式也是支持的
grep =lincrE "localhost|127.0.0.1" ./* |grep =vE "tutorial|machine"
screenshot
imagemaic import 命令。
nohup
http://www.cnblogs.com/allenblogs/archive/2011/05/19/2051136.html
这条命令用在,你退出session,命令继续。 并且自动的重定向输出。
du and df
检查是否有文件分区使用率(Use%)过高(比如超过90%)
df =h |grep =vE "tmpfs|udev"
如发现某个分区空间接近用尽,用以下命令找出占用空间最多的文件或目录:
du =csh /var/lib/state/* 或者排序 du =cks * |sort =rn| head =n 10
当发现硬件有空间,但是系统却报已经满了。 df =i 可以来看系统的inode是不是满了。
下载工具
主要有两个wget与curl, 类似curl功能更强,支持功能更多,wget 强的主要一点,那就是 recursively download. 并且都支持管道,但是curl支持更多一些。 例如 下载下来直接执行 wget =O = |sh 。 如何编程使用的话,用curl可能更加方便一些,毕竟后面一个跨平台的库在那里支持着。
如何查看linux的版本
/etc/issue
/etc/debian_version
/etc/readhat=release
/etc/os=release
/etc/lsb=release
利用特征文件 /etc/issue 或者 /etc/redhat=release 或者 /etc/debian_version
或者直接 cat /etc/*=release 就可以看到了。
如何判断linux是否运行在虚拟机上
http://www.vpsee.com/2011/01/how=to=detect=if=a=linux=system=running=on=a=virtual=machine/
主要是通过 /proc/vz /proc/xen/ 等文件来做的,一般这些地址会体现系统环境的。
文件批量重命名
linux专门一条:command:rename 指令。例如 我要把 .txt 变成 .rst rename 's/.txt/.rst/ XX.txt
取文件的部分内容
在文件添加一行,一个方法那就是用vim就可以了。 如果只是简单的行尾,那就是>>就搞定了。
date
格式化字符串 +% 例如 date +%Y/%m/%d , 另外相得到 上周一是几号 date =d 'last monday .
cronjob
crontab =l 列出当前所有的。 crontab =e 编辑当前cronjob。
http://stackoverflow.com/questions/18919151/crontab=day=of=the=week=syntax
minicom
minicom =D /dev/ttyUSB0 minicom =C log.txt =D /dev/ttypUSB0 保存log
ctrl+A 来进入控制台
Text=Terminal=HOWTO=11.html 为什么需要flow control,就是为解决速度不匹配的原因,并且解释了原理。
Development Tools
不同平台下,会有不同的名字, 在ubuntu 下那就是 build=essential 在centos 下 那就是 Development Tools
pkg=config 用来查看这个系统所安装库的,编译选项,以及所在的位置。而不需要人为去记住每一个库的编译选项。 在make 文件中常见的那就是
centos 的development tools
indent, C语言的格式美化工具。
https://www.kernel.org/doc/Documentation/CodingStyle kernel=devel 包
resize2fs 分区
resize2fs =F =f =p /dev/sda1 =M 最小化。
sync
有各种同步, sync是直接把cache中内容写回到硬盘,isync,dsync则是mail box同步,而zsync 则提供的是部分下载,文件下载到了一半,只需要同步一部分,相当于patch的功能,而rsync则是文件的同步。
ssh=keygen
ssh=copy=id user@remote_host
rsync  user@remote_host:~/XXXX  Local_path/XXXX
如何添加sudoer
这里有好几种做法,一种就是直接加入sudo. sudo adduser <username> sudo
或者直接在 /etc/sudoers.
%sudo ALL=(ALL:ALL) ALL
usermod =a =G sudo <username>
useradd =G admin =a <username>
删除0字节文件 find =type f =size 0 =xec rm =fr {} ;
查看进程,按内存从大到小排列 ps =e =o "%C :%p :%z :%a" |sort =k5 =nr
按CPU利用率从大到小排列 ps =e =o "%C :%p :%z :%a" |sort =nr
打印出cache里的url grep =r =a jpg /data/cache/* |string |grep "http:" |awk =F'http:' '{print "http:"$2;}
查看http的并发请求及其TCP连接状态 netstat =n|awk '/tcp/{++$[$NF]} END {for( a in S) print a,S[a]}'
这个文里Root的一行,匹配Root一行,把no,yes. sed =i '/Root/s/no/yes' /etc/ssh/sshd_config
如何杀掉mysql进程 ps aux |grep mysql |grep =v grep |awk `{print $2}' |xargs kill =9,
kill =TERM mysqld
kill =9 `cat /usr/local/apache2/logs/httpd.pid`
linux下的习惯把pid存入 xxx.pid文件。
利用 HEREdoc
cat <<EOF

+=========================+
| === Welcome to `whoami` |
+=========================+
EOF
for 来建立连接
cd /usr/local/mysql/bin
for i in *
   do ln /usr/locla/myql/bin/$i /usr/bin/$i
done
内存的大小 :command;`free =m | grep “Mem” | awk ‘{print $2}’`
20 swap 空间# free
检查swap used 值是否过高如果swap used 值过高,进一步检查swap 动作是否频繁:
# vmstat 1 5
观察si 和so 值是否较大
21 磁盘空间# df =h
检查是否有分区使用率(Use%)过高(比如超过90%) 如发现某个分区空间接近用尽,可以进入该分区的挂载
点,用以下命令找出占用空间最多的文件或目录:
# du =cks * | sort =rn | head =n 10
22 磁盘I/O 负载# iostat =x 1 2
检查I/O 使用率(%util)是否超过100%
23 网络负载# sar =n DEV
检查网络流量(rxbyt/s, txbyt/s)是否过高
24 网络错误# netstat =i
检查是否有网络错误(drop fifo colls carrier) 也可以用命令:# cat /proc/net/dev
25 网络连接数目# netstat =an | grep =E “(tcp)” | cut =c 68= | sort | uniq =c | sort =n
26 进程总数# ps aux | wc =l
检查进程个数是否正常(比如超过250)
27 可运行进程数目# vmwtat 1 5
列给出的是可运行进程的数目,检查其是否超过系统逻辑CPU 的4 倍
28 进程# top =id 1
观察是否有异常进程出现
29 网络状态检查DNS, 网关等是否可以正常连通
30 用户# who | wc =l
检查登录用户是否过多(比如超过50 个) 也可以用命令:# uptime
31 系统日志# cat /var/log/rf logview/*errors
检查是否有异常错误记录也可以搜寻一些异常关键字,例如:
# grep =i error /var/log/messages
# grep =i fail /var/log/messages
32 核心日志# dmesg
检查是否有异常错误记录
33 系统时间# date
检查系统时间是否正确
34 打开文件数目# lsof | wc =l
检查打开文件总数是否过多
35 日志# logwatch –print 配置/etc/log.d/logwatch.conf ,将Mailto 设置为自己的email 地址,
启动mail 服务(sendmail 或者postfix),这样就可以每天收到日志报告了。
缺省logwatch 只报告昨天的日志,可以用# logwatch –print –range all 获得所有的日志分析结果。
可以用# logwatch –print –detail high 获得更具体的日志分析结果(而不仅仅是出错日志)。
36.杀掉80 端口相关的进程
lsof =i :80|grep =v "PID"|awk '{print "kill =9",$2}'|sh
37.清除僵死进程。
ps =eal | awk '{ if ($2 == "Z") {print $4}}' | kill =9
38.tcpdump 抓包,用来防止80 端口被人攻击时可以分析数据
# tcpdump =c 10000 =i eth0 =n dst port 80 > /root/pkts
39.然后检查IP 的重复数并从小到大排序注意"=t\ +0" 中间是两个空格
# less pkts | awk {'printf $3"\n"'} | cut =d. =f 1=4 | sort | uniq =c | awk {'printf $1" "$2"\n"'} | sort =
n =t\ +0
40.查看有多少个活动的php=cgi 进程
netstat =anp | grep php=cgi | grep tcp | wc =l
chkconfig ==list | awk '{if ($5=="3:on") print $1}'
41.kudzu 查看网卡型号
kudzu ==probe ==class=network
常用的正则表式
- 匹配中文字符的正则表达式: [u4e00=u9fa5]
- 评注:匹配中文还真是个头疼的事,有了这个表达式就好办了
- 匹配双字节字符(包括汉字在内):[x00=xff]
- 评注:可以用来计算字符串的长度(一个双字节字符长度计2,ASCII 字符计1)
- 匹配空白行的正则表达式: ns*r
- 评注:可以用来删除空白行
- 匹配HTML 标记的正则表达式:<(S*?)[>]*>.*?</1>|<.*? />
- 评注:网上流传的版本太糟糕,上面这个也仅仅能匹配部分,对于复杂的嵌套标记依旧无能为力
- 匹配首尾空白字符的正则表达式: s*|s*$
- 评注:可以用来删除行首行尾的空白字符(包括空格、制表符、换页符等等),非常有用的表达式
- 匹配Email 地址的正则表达式:w+([=+.]w+)*@w+([=.]w+)*.w+([=.]w+)*
- 评注:表单验证时很实用
- 匹配网址URL 的正则表达式:[a=zA=z]+:/ /[s]*
- 评注:网上流传的版本功能很有限,上面这个基本可以满足需求
- 匹配帐号是否合法(字母开头,允许5=16 字节,允许字母数字下划线):[a=zA=Z][a=zA=Z0=9_]{4,15}$
- 评注:表单验证时很实用
- 匹配国内电话号码: d{3}=d{8}|d{4}=d{7}
- 评注:匹配形式如0511=4405222 或021=87888822
- 匹配腾讯QQ 号:[1=9][0=9]{4,}
- 评注:腾讯QQ 号从10000 开始
- 匹配中国邮政编码: [1=9]d{5}(?!d)
- 评注:中国邮政编码为6 位数字
- 匹配身份证: d{15}|d{18}
- 评注:中国的身份证为15 位或18 位
- 匹配ip 地址:d+.d+.d+.d+
- 评注:提取ip 地址时有用
- 匹配特定数字:
- [1=9]d*$ 匹配正整数
- =[1=9]d*$ 匹配负整数
- =?[1=9]d*$ 匹配整数
- [1=9]d*|0$ 匹配非负整数(正整数+ 0)
- =[1=9]d*|0$ 匹配非正整数(负整数+ 0)
- [1=9]d*.d*|0.d*[1=9]d*$ 匹配正浮点数
- =([1=9]d*.d*|0.d*[1=9]d*)$ 匹配负浮点数
- =?([1=9]d*.d*|0.d*[1=9]d*|0?.0+|0)$ 匹配浮点数
- [1=9]d*.d*|0.d*[1=9]d*|0?.0+|0$ 匹配非负浮点数(正浮点数+ 0)
- (=([1=9]d*.d*|0.d*[1=9]d*))|0?.0+|0$ 匹配非正浮点数(负浮点数+ 0)
- 评注:处理大量数据时有用,具体应用时注意修正
- 匹配特定字符串:
- [A=Za=z]+$ 匹配由26 个英文字母组成的字符串
- [A=Z]+$ 匹配由26 个英文字母的大写组成的字符串
- [a=z]+$ 匹配由26 个英文字母的小写组成的字符串
- [A=Za=z0=9]+$ 匹配由数字和26 个英文字母组成的字符串
- w+$ 匹配由数字、26 个英文字母或者下划线组成的字符串
- 评注:最基本也是最常用的一些表达式
notification
当执行一个长时间的事情的时候,能不能自动通知,有几种方式,
- 声音, beep,aplay,pacmd,espeaker.
- email, 可以通过邮件,自动发邮件
- 动画, 例如利用xlock,xeve,xbotton等直接在屏幕上显示动画。
- 可以用 watchdog 来添加一些监控
fortune
可以随机产生诗句。
udevadm
查看硬件的变动 udevadm monitor.
pdfgrep
googler
命令行google工具。
How2
命令行的stackoverflow工具。 https://github.com/gwli/how2
ndiff
nmap 输出的diff工具。 我们可能需要各种对象的diff工具。可以对比xml文本输出。
如何制作 rootfs
use ssh in pip line
- Remote backup
- run script on remote machine
- file transfer
chroot
特别来修复坏的系统,用chroot特别有用。
当然还有schroot, dchroot,pivot_root 具体见 此 pivot_root和chroot的主要区别是,pivot_root主要是把整个系统切换到一个新的root目录,而移除对之前root文件系统的依赖,这样你就能够umount原先的root文件系统。而chroot是针对某个进程,而系统的其它部分依旧运行于老的root目录。
mount 的时候,会把mount的所有信息都放在 /etc/mtab 但是当 /etc 只读的情况下,就会mount失改,这时候就会用到 mount =n 不写 /etc/mtab
gtop
基于console的可视化例如windows resmonitor
例如xargs列表也会有妙用
man xargs 作用就是把字节流变换成list, 可以用-d 来指定界符,同时每几个元为一组 -n 3,同时这个参数参入到哪里 -I %,同时也可以指字最多多少命令并行 -P 0 就是尽可能多。
find -iname "lib*.so" |xargs -I % mv %  ./backdir/
find -iname "lib*.so"|xargs -d '\n' -I % mv % ./backdir/
如何得到精确的CPU时间
一种是采用 getconf CLK_TCK 再加/proc/pid/stat 来实现。 另一个那就是top -bn 1 就行了。 https://straypixels.net/getting-the-cpu-time-of-a-process-in-bash-is-difficult/
- bash中trap的用法 bash 可以接收64个中断
zenity GUI
zenity 一个小巧方便的用户交互的GUI. ,`zenity for windows <http://www.placella.com/software/zenity/>`_
zenity --entry --text="Please enter your_name"
linux 和选择
其实只要看到每一个事情起源就自然明白其源由了,例如这么多linux,到底各有什么区别,只要再一下其各个发展史,以及先后顺序就知道了。例如 apt-get dpkg这种方式是debian首创的。 后面系统都会吸取前面系统的优点。 gentoo是出现最迟的,当然也就是优点更多一些了。
linux服务器系统CentOS、uBuntu、Gentoo、FreeBSD、Debian的比较 redhat由于追求稳定性,而发展太慢。而ubuntu 则是通过快速的迭代用的新的技术也保证稳定性。那也就是敏捷也追求吧。这也是 为什么ubuntu server在逐步蚕食CentOS的市场份额? 由于技术本质就是求新求快。例如redhat 中自带的python现在还是2.6。 这些采用自己安装。当然他有一些自己特定的优势。但是长期是谬论, python 2.7 肯定比2.6要更强,更稳定。不管的你的内核更稳定,你的用python不行,还是不行的。当然还得瓶颈是在哪里。
usb 启动盘制作
要想让其可启动,就要让BIOS能够认出来,也就是BIOS本身具有相应的驱动,或者中间的转接,然后是在其引导有引导代码类似于grub的代码能执行,并加载相应的kernel.
用AT&T 汇编实现 第一个bootloader BIOS 通电-将磁盘第一个扇区512字节copy到内存的0x0000:0x7c0处,并将CS寄存器设置为0x0000,IP设置为0x07c0, 因为现在CPU处于实模式下,所以CPU下一条将要执行的指令就是CS:IP 将是 0x:0000:0x7c0, 这样就能挂靠 到我们写的bootloader了。
所以只要把USB变成可引导盘,并且分区格式化并不会影响MBR,因为这个是分区之外的事情。 然后就可以像里面copy kernel了。这也就是为什么,今天直接往U盘copy 光盘内容就可以用了的原因。
software install apt-get
- linux package management build and compile
One of the key function is process the package denpendencies. this is a troubleness on linux. but the apt-get help to handle them.
as long as,you use share resource with each other, there must be an issue of dependencies. kernel module has this issue. system package has this issue. dependency is anywhere of linux system.
so there are so many managetools. for ubuntu and debian there is apt-get, dpkg, for SUSE there are zypper and yaST. for Centos and Redhat , there is yup.
gentoo also has its own package system and configuration management system.
sourcelist support three source
- deb
- deb-src
- ppa
- add-apt-repository ,`PPA <How do I use software from a PPA?]] [[https://launchpad.net/ubuntu/+ppas>`_ is Personal Package Archives (PPA) allow you to upload Ubuntu source packages to be built and published as an apt repository by Launchpad.
apt-get --yes install $something

is that it will ask for a manual confirmation if the package signature owner's public-key is not in the keyring, or some other conditions. to be sure it does not ask a confirmation just do this:

apt-get --yes --force-yes install $something

If you want to have these settings permanent, create a file in /etc/apt/apt.conf.d/, like /etc/apt/apt.conf.d/90forceyes with the following content:

APT::Get::Assume-Yes "true";
APT::Get::force-yes "true";
apt-cache search 库。

// get the lib url
apt-cache policy "xxxlib"
在17.10之后,就可以直接使用 apturl 来直接从网址安装了,https://help.ubuntu.com/community/AptURL
如果出现 出现PGP key error 缺 key
sudo apt-key adv --keyserver keyserver.ubuntu.com --recv-keys 437D05B5 3E5C1192
sudo apt-get update
多版本安装
就像python 可以有自己的virtualenv, 对于系统级的其他应用可以用alternatives 命令的相关方式。来管进行管理 配置。
alternatives -install XX
update-alternatives
如果想添加不同架构的deb
可以用 APT::Architectures http://stackoverflow.com/questions/6331109/how-to-setup-multiple-architecture-development-environment-under-ubuntu-11-04 或者使用 dpkg –add-architecture arm64 这样来实现。或者安装某一个包时直接使用 xxx:<arch> 例如 libglog4cxx10-dev:i386
同时还可以下载代码 apt-get source package-name 就可以直接下载当前目录了。
如何安装新版本上的package
直接使用 Pin的方法,本质就是添加新版本的源,以及修改 /etc/apt/preferences https://help.ubuntu.com/community/PinningHowto
自己从源码编译
apt-add-repository "deb-src ....."
apt-get update
apt-get build-dep firefox-3.0
apt-get -b source -t "release branch" firefox-3.0
make && make install
直接使用 UbuntuBackports
如何保持一个包不更新
sudo apt-mark hold <packagename>
#check
apt-cache policy <packagename>
# unhold
echo xxxxx install |dpkg --set-selections
如何查看所有可用更新
aptitude search '~U'
可用命令
apt list
apt search
apt full-upgrade
apt install
apt remove
aptdcon, 这个可以把安装放在队列里,以及不需要root,而不需要人为等另一个install 完成。
同时采用 apt-extracttemplate 把当前系统安装包生成template. 然后在其他机器上安装。
源列表格式
http://manpages.ubuntu.com/manpages/wily/man5/sources.list.5.html
apt-get upgrade 只是升级到当前的软件到最新版本, apt-get dist-upgrade,升级到大版本。 或者用 sudo do-release-upgrade
安装列表
apt-get install $(grep -vE "^s*#"|tr "n" '') http://askubuntu.com/questions/252734/apt-get-mass-install-packages-from-a-file
dpkg
- 查询包 dpkg -l |grep vnc
- 删除 dpkg -r vnc
- 查看依赖 apt-cache depends packagename
- 查看安装了哪些文件 dpkg -L packagename
安装位置的选择
usr is stand for unix system resource, http://askubuntu.com/questions/1148/what-is-the-best-place-to-install-user-apps 如果只是zip包 standalone App,可以直接使用就放在/opt下面。
下一代包管理器
如何快速的制作一个linux系统
在一个现在系统上直接把系统文件打包
$tar cvzf suse11_sp3.tgz bin boot etc lib lib64 opt root sbin selinux srv usr var
tar -czpf --one-file-system / | ssh name@hostname "(cat >ssh_systemrootfs.tgz)"
在目标机上直接硬盘分区格式化,然后解压
$ tar xvf suse11_sp3.tgz
并创建那些动态的目录
@mkdir dev media mnt proc tmp
然后启动盘来修复起动项
$restore grub,
mount /dev/sda1 /mnt/sda1
grub-install --boot-directory=/mnt/sda1/boot /dev/sda1 --force
grub-mkconfig -o /mnt/sda1/boot/grub.cfg
install
所有安装最终操作就是copy文件,并且配制正确的权限与属性,以及根据系统的环境,向系统注册一些信息,或者添加环境变量。 所以纯手工的操作那就是cp+chown,chmod+strip 等等。 而在 install 一条命令就把这些全度搞定了。 http://unix.stackexchange.com/questions/94679/what-is-the-purpose-of-the-install-command
ubuntu 发行光盘的制作
现在对于linux的整个框架熟悉了之后,再怎么操作,就容易了,也就是那些stage3 tarball就看你怎么安装了。 用什么介质就要使用对应的格式。 例如光盘格式 sqfs 就是为方面其把从光盘放进内存里。 或者其他的.img格式。直接放在哪里,然后直接chroot启动,或者chroot之后再更新。或者可以在 android 的源码中可以找到各种工具 /build/tools/XXX。 例如img 解压,对比工具等等。
至于采用什么格式,还得看启动kernel支持哪种类型,一般都会支持sqfs格式的。
由于ISO文件中只读,于是不能写入。 于是就有casper-rw 的功能,实际就是在系统里默认mount这个目录,利用autofs,unionfs的功能http://unionfs.filesystems.org/ 就实现了这个功能。也就是在USB生成一个casper-rw的文件。 并利用mkfs -f 把这个文件当做系统格式化。 dd 来生成这样一个文件。
- http://www.syslinux.org/wiki/index.php/ISOLINUX
- http://unix.stackexchange.com/questions/122832/how-to-use-casper-rw-file-for-persistance
- https://help.ubuntu.com/community/LiveCDCustomization
- http://lifehacker.com/5085405/make-any-linux-directory-into-an-iso-file
而casper,ubuntu 等这些用户都是动态创建的。主要过程那就是/casper/filesystem.squashfs 的制作与修改。 而起动时需要initrd.lz 以及其修改。当然也可以利用ubuntu Customization Kit. https://help.ubuntu.com/community/LiveCD/Persistence 原来创建一个Casper-rw 文件来进行存储,这个大小 还是可以重定义的。
preseed 目录是用来存放预配置文件。
实现也是采用grub来起动的。
Creat bootable usb
- Download syslinux on windows
http://www.kernel.org/pub/linux/utils/boot/syslinux/syslinux-4.04.zip
Format USB stick in fat32
Copy syslinux.exe to <usb>/boot/syslinux
boot
cd <usb>\boot\syslinux
syslinux.exe -ma -d /boot/syslinux <usb driver letter:>
find these files and copy to <usb>bootsyslinux
memdisk 引导IMG镜像的文件 vesamenu.c32 二种窗口模块之一 menu.c32 二种窗口模块之一 chain.c32 指定分区启动 如:chain.c32 hd0,1 (或chain.c32 hd1,1) reboot.c32 重新启动计算机 Create an empty file named livecd in usb root
cat ***ISO >/dev/sdb ;sync
network install
Install NFS on Ubuntu
sudo apt-get install nfs-kernel-server
Edit /etc/exports, add line at the end of file:
/home/tss3st *(rw,sync,no_root_squash)
Restart NFS service
sudo service portmap restart
sudo service nfs-kernel-server restart
showmount -e
### Mount A:/home/A/ on Solaris
- Login to B as user “root”
- Create directory:
| mkdir -p /mnt/svlinux01/home/A/ |
- Mount:
| mount -F nfs -o rw A:/home/A/ /mnt/A/home/A | |
| fs-nts3 <IP>:/remotepathin_etc_exports <localPath> |
- Chmod:
| chmod 777 /mnt/A/home/A/automation/mail/ |
- Create soft link:
| ln -s /mnt/svlinux01/home/A/automation/mail/ /home/A/WWW/automation/mail/ |
Mount and chmod on each Solaris For all Solaris which we run NEAT, we need to mount this directory to local /mnt directory and chmod for it:
双系统看不到起动菜单 自己来搞grub,或者把linux先装一下,再然后再重装一下就Ok了。再次重装的时候,它会识别出两个系统就会自动去做。
– Main.GangweiLi - 15 Jan 2013
vmware share folder linux 下的目录是 /mnt/hgfs
– Main.GangweiLi - 15 Jan 2013
如何快速部署linux 1. 使用dd, 或者类似于ghost东西,把一个硬件快速复制另一个硬件,然后拿去直接启动使用,但是windows7要把设置成初始安装模式,这样才能启动,因为它的启动会去读硬盘信息。
– Main.GangweiLi - 15 Jan 2013
使用户具有sudo功能
addsuer “victor” sudo usermod -G adm -a victor vim /etc/sudoers copy root to a new line change root to victor
backup and restore
when backup and restore, there is three things to know: %BROWN% #. size of data #. start address, in another way where is it? #. what type of the data. do we need now the internal structure, due to some manipulation on the data is base on its internal structure ,that’s the type. %ENDCOLOR% there is some way: dd directly copy sectors to the harddisk. but how the dd know the how many the space is used. partclone can do the backup and restore base on the partition. and it know many space is used.
– Main.GangweiLi - 28 Mar 2013
Configuration structure Now, most of the big application use configuration. and these configuration mechanism should have include, so that there is structure:
- /etc/ld.so.conf
- include /etc/ld.so.conf.d/XX.conf
- /etc/ld.so.conf.d/
- XXXXXXXXX.conf AAAAAAA.conf
– Main.GangweiLi - 14 Apr 2013
file operation each one type of archive file, would support XXgrep,XXcat,xxxfind,xxxless.
???BLOCK MISSING
如何修复系统
https://help.ubuntu.com/community/LiveCdRecovery
livecd 起动
chroot to harddisk
mount /sda2 /mnt/sda2
mount -t proc /proc /mnt/sda2/proc
mount --rbind /sys /mnt/sda2/sys
mount --make-rslave /mnt/sda2/sys
mount --rbind /dev /mnt/sda2/dev
mount --make-rslave /mnt/sda2/dev

chroot /mnt/sda2 /bin/bash

#open 2nd terminal
cat /etc/resolve.conf /mnt/sda2/etc/resolve.conf
apt remove <bad package>
apt autoremove
apt update
apt install <right packages>
#apt install linux-generic
apt upgrade
网络
如何检查网速
自己直接ifconfig ; sleep 1;ifconfig 查看结果相减就可以了。当然也有一些其他的命令 nload,iftop,iptraf,nethogs,bmon http://os.51cto.com/art/201404/435279.htm
dns lookup
nslookup 可以查询IP,或者域名。
/etc/resolve.conf 来配置DNS
nameserver 10.19.189.252
search xxx.com
但是其他域名管理,以及LDAP等等以及NIS都是通过NSS来管理的,配置文件在 /etc/nsswitch.conf .
IP 冲突
在windows下会有直接提示IP冲突。 在linux下则没有。
如何检则
在其中冲突的一台用 arping .
localhost:~ # arping -I eth1 10.19.189.113
ARPING 10.19.189.113 from 10.19.189.122 eth1
Unicast reply from 10.19.189.113 [AC:22:0B:4B:98:6F]  0.735ms
Unicast reply from 10.19.189.113 [78:24:AF:C0:B7:48]  0.787ms
Unicast reply from 10.19.189.113 [78:24:AF:C0:B7:48]  0.866ms
Unicast reply from 10.19.189.113 [78:24:AF:C0:B7:48]  0.861ms
Unicast reply from 10.19.189.113 [78:24:AF:C0:B7:48]  0.863ms
Unicast reply from 10.19.189.113 [78:24:AF:C0:B7:48]  0.930ms
Unicast reply from 10.19.189.113 [78:24:AF:C0:B7:48]  0.861ms
Unicast reply from 10.19.189.113 [78:24:AF:C0:B7:48]  0.863ms
Unicast reply from 10.19.189.113 [78:24:AF:C0:B7:48]  0.861ms
Unicast reply from 10.19.189.113 [78:24:AF:C0:B7:48]  0.863ms
查看本地的arp cache
$ arp -a <IP>
如何更新DHCP获得IP地址
用ifconfig
ifconfig set eth0 DPCP
用dhclient
dhclient -r && sleep 20 && dhclient
dhcp 的配置文件在 /etc/sysconfig/network/dhcp
# If it happens during booting it won't be a problem and you can
# safely say "yes" here. For a roaming notebook with X kept running, "no"
# makes more sense.
#
DHCLIENT_SET_HOSTNAME="no"

## Type:        string
## Default:     AUTO
如何配置双机共享网络
https://askubuntu.com/questions/169473/sharing-connection-to-other-pcs-via-wired-ethernet
选择编辑网络
建立一个新连接
ipv4 setting 选择 “share to other computers”
ifconfig 就能看到这个端口上起了一个DHCPserver. 也可以用以下命令
ifconfig eth0 [-]pointtopoint [addre]
gentoo 的网卡启动过程
- 上电启动,内核的加载驱动并注册相应的中断,内核可以识别硬件了。
- udev 识别硬件信息,并建立相应的逻辑设备,例如网卡哪一个eth0,哪一个是eth1,以及USB
等等。所以要改设备的逻辑名,就是在这个时候时候改的
/etc/udev/rules.d/ - init 根据runlevel决定起哪些服务。 各个启动过程,几家linux的实现,大体上一致,而事实是各个不相同。
- gentoo 是在
/etc/runlevel下的,并且采用 rc-config 来查看的。 - 直接在对应的level下建立一个link 就可以了。
- gentoo 是在
- SUSE 的启动是并行的,是用.before, .after等来实现的。
SSH
#.forward X
ssh -X user@hostname

#no password login
#. ssh-keygen
#. ssh-copy-id user@remotehost
#. vim ~/.ssh/config  (file owner 600)

   Host devbox
      HostName <IP>
      Port 22
      User test
      PreferredAuthentications publickey
      IdentityFile ~/.ssh/id_rsa
- 对于
如何扫描机器IP
nmap -p 22 --open -sV 10.19.189.0/24 >sshservers
grep -B 4 'OpenSSH 5.8p1' sshservers
电源管理
各家笔记本除了功能,一个很重要的能力那就是续航能力,如何定制优化来延长续航能力。 内核管理模块 acpi,apm, [1] 详细讲了ubuntu笔记本电源管理优化 [2] 是ubuntu 官方的电源管理指南 [3] acpid 电源相关事件的守护进程
gentoo
vebegin,veend, ebegin,eend. ewarning
这些是gentoo为了美化console的输出,而实现的一些格式化命令. ewaring 给你前面加个* 并且还绿色.
对于rc.local的输出,没有有产生,是在于被 重定向到/dev/null中了.
只需要这个改掉了就行了.https://forums.gentoo.org/viewtopic-t-1009110.html?sid=ab27cf116dba07711a215b9a7ae8f3bb
echo "rc_verbose=yes" > /etc/conf.d/local
可以参考https://devmanual.gentoo.org/ebuild-writing/messages/index.html message的格式化.
对于从stage1,开始,无非要从buildchain的准备开始.然后根据依赖,逐个库的编译. https://forums.gentoo.org/viewtopic-t-420117-highlight-fiordland.html http://www.linuxforums.org/forum/gentoo-linux/191522-gentoo-stage-1-installation-info.html
编译,主要 也就是编译选项与链接选项.
对于kernel的生成,也有现成工具来一步生成kernel,initramfs https://wiki.gentoo.org/wiki/Genkernel https://wiki.gentoo.org/wiki/Initramfs/Guide https://gitweb.gentoo.org/proj/genkernel.git
对于ntfs-3g 找不到2.8的库
经过对比好的机器上的库的依赖,发现只是ln 不对,在出错的机器上的,libfuse.so.2 -> libfuse.so.2.7,而机器 上是有 libfuse.so.2.9 ntfs-3g 要求 2.8. 所以2.9肯定可以用。 所以只用修改一下软链就行了。
直接使用livecd的编译
cp /proc/config.gz .
gunzip config.gz
cat config >/usr/src/linux/.config
you find bzImage from /usr/src/linux/arch/x86/boot/bzImage
升级
- 下载minimal-livecd
- configureation for STAGE3
- cp config for livecd (x86)
- create bzImage
- create initramfs(应该与bzImage的arch一致).
- 更新fdisk
- install perl lib.
- install grub
- create mpcd, and tarball.
genkernel
sys-kernel/genkernel /usr/share/genkernel 有各种现成的脚本
Ubuntu
- vim
- sshd
- root login
- https://help.ubuntu.com/community/AutoLogin
- lightdm.conf
- gtl
How to build Your own Kernel
SUSE
安装要求
- install build toolchain
- auto login as root
- config vnc yast/vnc administrator
- install nvidia driver
- disable fireware
- setup ssh
- startup application
- config /etc/fstab
- disable screen lock
Note
gnome-control-center 控制面板
如何安装 nvidia driver
# install kernel source
# insert 2nd DVD
zypper install kernel-source
rcxdm start
./NVIDIA-linux-x86_64.run
rcxdm stop
chkconfig 启动service http://superuser.com/questions/752448/how-to-make-a-service-start-in-suse-enterprise-linux
How to run my script after SuSE finished booting up http://unix.stackexchange.com/questions/43230/how-to-run-my-script-after-suse-finished-booting-up
disable firewall
/sbin/SuSEfirewall2 off
/sbin/SuSEfirewall2 on
/etc/init.d/SuSEfirewall2_setup stop
Root autologin: https://gist.github.com/gwli/c94fec782aab125d6a0c
vi /etc/sysconfig/displaymanager
DISPLAYMANAGER_AUTOLOGIN=”root”add repo source yast2>software repository
Centos
how to config
sshd run on startup chkconfig sshd on
install python 2.7 on centos 6.5
http://bicofino.io/blog/2014/01/16/installing-python-2-dot-7-6-on-centos-6-dot-5/
hostname
hostname computername
vim /etc/hostname
build-essential
yum groupinstall "Development Tools"
bootup options
/etc/rc.local
/etc/rc.d/rc.local
vncserver
rpm -qa |grep vnc
yum install tigervnc
yum install tigervnc-server
vncserver
disable firewall
/sbin/service iptables stop
change xstartup file
unset SESSION_MANAGER
exec /etc/X11/xinit/xinitrc
[ -x /etc/vnc/xstartup ] && exec /etc/vnc/xstartup
[ -r $HOME/.Xresources ] && xrdb $HOME/.Xresources
xsetroot -solid grey
vncconfig -iconic &
xterm -geometry 80x24+10+10 -ls -title "$VNCDESKTOP Desktop" &
gnome-session & #set starting GNOME desktop
#startkde & #kde desktop
#twm & #Text interface
#/usr/bin/startxfce4
#exec /usr/bin/fluxbox
- bootup chkconfig vncserver on chkconfig iptables off
this new method is working vnc-server-installation-on-centos-7
autologin
vim /etc/gdm/custom.conf
[daemon]
AutomaticEnable=true
AutomaticLogic=root
Note
this just work VM.
| [4] | http://blog.csdn.net/kpshare/article/details/7523546 |
https://www.centos.org/forums/viewtopic.php?f=47&t=48288
- usb install
- http://wiki.centos.org/zh/HowTos/InstallFromUSBkey
- dd if=CenOS-6.5.iso of=/dev/sdb ## method 2 cat XX.iso >/dev/sdb sync
install nvidia driver
init bootup
grub
- change device.map
- /etc/default/grub
- /etc/grub.d/RAME
- /etc/fstab or /etc/init/fstab
mountall
the bootmenu just like an txt control. as you use the raw_input.
enter text interface
ctrl+alt+F1~F6
no lock screen
change power management.
config boot
config /etc/fstab
#. /etc/fstab
#
# /etc/fstab
# Created by anaconda on Tue Mar 17 01:42:54 2015
#
# Accessible filesystems, by reference, are maintained under '/dev/disk'
# See man pages fstab(5), findfs(8), mount(8) and/or blkid(8) for more info
#
/dev/sda1 /                       ext4    defaults        1 1
change /boot/grub2/grub.cfg
if [ x$feature_platform_search_hint = xy ]; then
    search --no-floppy --fs-uuid --set=root --hint-bios=hd0,msdos1 --hint-efi=hd0,msdos1 --hint-baremetal=ahci0,msdos1 --hint='hd0,msdos1'  35bf2afd-b8f4-4a7e-ab82-12adba3e8cbc
else
    search --no-floppy --fs-uuid --set=root 35bf2afd-b8f4-4a7e-ab82-12adba3e8cbc
fi

####### change from above to the below
if [ x$feature_platform_search_hint = xy ]; then
          search --no-floppy --file --set=root --hint-bios=hd0,msdos1 --hint-efi=hd0,msdos1 --hint-baremetal=ahci0,msdos1 --hint='hd0,msdos1'  /boot/vmlinuz-3.10.0-123.20.1.el7.x86_64
else
    search --no-floppy --file --set=root /boot/vmlinuz-3.10.0-123.20.1.el7.x86_64
fi